Labels

Sunday, January 27, 2013

Roast Part 2: Beefy Spaghetti

So, Friday morning I went to the grocery store and bought a chuck roast. I planned for the roast to serve as the basis for three meals. Yesterday's post details how I made the meat that will go into Saturday night's beefy spaghetti.

For the spaghetti sauce, I used the sauce recipe in the following post on the Food Network website: Turkey Meatballs with Quick and Spicy Tomato Sauce and Whole Wheat Spaghetti, by Ellie Krieger. (If I had a clue about web technology, no doubt I could add a link taking you directly to the recipe. Alas, I have no clue.) 

Needless to say, I did not use the turkey meatball part of the recipe on this day. Nor did I use the whole wheat spaghetti, but I'll explain that later. I have made this recipe as written including the turkey meatballs, and we really liked it. That's how I knew this sauce would be good with the beef.

On Friday, while the beef was roasting in the oven, I decided to get a head start on Saturday night's dinner.    
Start by chopping one onion and three cloves of garlic. Add olive oil to a 4-quart pot over medium heat. After a couple of minutes, add the onion to the pot, sprinkle with salt, and cook until softened. Add the garlic and cook a minute or so.    Add the tomato paste. 

I like tomato paste that comes in a tube. So often recipes call for a tablespoon or two and a can is just a waste. By using the tube, you can use small amounts at a time, put the tube back in the refrigerator, and have tomato paste for another day. 

It's pretty much the same thing with chipotle in adobo. You buy it in the ethnic section of the grocery store and it comes in a can. Dump everything out of the can and chop it really finely. What you don't use for the recipe, scrape into a snack zip-top bag, label, and toss in the freezer. Then you can break off enough to use for any recipe that comes along.  

This time, I took the whole bag out, used the amount for this recipe, and put the rest in the refrigerator. (Hint: it will be used in Part 3 of the roast recipes.)  
Stir the tomato paste and chipotle into the onions and garlic for a minute or so. 
Add in the rest of the ingredients and continue the recipe as on the website.

After the sauce has cooked 15 minutes, take it off the heat and add the meat saved from the previous day's roast. At this point, I refrigerated the sauce to reheat the next day.
On Saturday, we were out of the house until about 6:45 p.m. When we got home, I put a large pot of water on to boil for the spaghetti. Instead of whole wheat spaghetti, I use Ronzoni Smart Taste pasta which is "white" pasta with extra fiber. This is close to whole wheat pasta in Weight Watcher points because of the fiber, and tastes exactly the same to me as regular pasta. 

(To let you in on how much I love this pasta, I have a case each of thin spaghetti and rotini in my basement. Frightening, I know.)

Next, I took the sauce out of the refrigerator and put it in a pot over medium heat. Watch it closely, as tomato products tend to scorch on higher heats.

Once the pasta is cooked according to the package directions for "firm," reserve a cup of the cooking liquid, drain the rest of the pasta, and add the pasta to the sauce. Toss the pasta with the sauce to combine completely. Use the reserved liquid, if needed, to thin the sauce to the desired consistency. I forgot to add the fresh basil, a fact which did not come to my mind until I was typing this entry. Don't forget the basil!

To accompany the pasta,  I decided to serve a Caesar salad, also by Ellie Krieger. (Copy the following into your bowser. Again the disclaimer regarding technology)
http://www.finecooking.com/recipes/caesar-salad-grilled-shrimp.aspx

As before, I only used part of this recipe. I used the croutons and the salad, but not the shrimp. 

Here are the croutons when done:

 Mix up the dressing in the bowl in which you want to serve the salad, add chopped/sliced Romaine lettuce, and toss.


I served the spaghetti and salad on one plate. You, of course, should serve in whatever way makes you, or the ones you serve, happy!

Tune in tomorrow for Part 3....

Saturday, January 26, 2013

One Roast, Three Dinners

Last weekend,  I cooked a whole chicken in the crock pot and used the finished product for three meals: chicken and rice Friday night, chicken salad Saturday for lunch, and chicken enchiladas Sunday night. While I do not plan to use that same crock pot recipe again (my oven roasted recipe is much better), I was inspired to try the same thing again this weekend.  

This weekend, I went with a boneless chuck roast. (I went to the store looking for a chuck roast on the bone, but this is what Publix had on this cold, dreary Friday morning.)

This method comes compliments of my sister's in-laws and is in my personal recipe book labeled "Bullard Pot Roast." (Thanks, Linda!)

Preheat the oven to 300 degrees. Pat the roast dry. Liberally add salt, pepper, and granulated garlic to both sides.  See? 

Since I only had enough granulated garlic for one side of the roast, I sliced a few fresh garlic cloves for the second side.

If you use fresh garlic, don't add it yet!

Here's the only place I changed it up a little. The recipe calls for the roast to be placed in a glass baking dish and broiled in the oven on each side to brown. I've done that before, but for some reason I just wanted to use my beloved, bright and cheery dutch oven this time. 
Add a little olive oil (maybe a tablespoon) to a dutch oven over medium-high heat on the stove. When the oil is hot, add the roast to the pot. (I first put down the side that had the granulated garlic on it).

Once it's nice and brown, turn it over and brown the other side. Then flip it back over so the first side browned is on the top. Scatter the sliced garlic across the top of the roast. Be careful none falls to the bottom of the pan or it may burn.  
Slice an onion in about 1/2" thick slices and place the slices on top of the roast. I think they sort of baste the roast as it cooks. 

Add about a cup of water to the pot. Add more if you like a lot of gravy.

Place a tightly-fitting lid on top. (Since the roast was going to be in the oven for a long time, I covered the lid's handle with aluminum foil.)  If you use the oven-broiled method to brown the roast, cover the baking dish tightly with several layers of aluminum foil to seal. 

Put the pot/dish in the oven and cook for 2 - 3 hours. (My roast was about 3 pounds and I cooked it for 3 hours).

After 2 - 3 hours, take the roast from the oven and it will look lovely and smell so delicious!

Remove the onions to a platter to serve alongside the roast. If you use fresh garlic, you can decide to leave it on the roast or scrape it off at this point. 

Move the roast to a cutting board. If you plan to use the roast for more than one meal,  only add the amount you need for this meal to the platter with the onion. Leave the rest on the cutting board for preparing for the other meals. 

For this meal, I wanted to make gravy. I drained the liquid from the pot and strained it into a fat separator. I added one tablespoon of olive oil back to the pot and set it over medium heat. I added one tablespoon of flour and whisked to combine for about a minute. I added some of the reserved liquid back to the pot and whisked to combine. When I tasted it, it had great flavor, but was too salty. I added some water, whisked, tasted. I tweaked it, adding more reserved liquid or water, until it tasted yummy. I let it simmer for a few minutes to thicken it. 

I rounded out the meal with Ellie Krieger's Roasted Nutmeg Cauliflower, boxed quick rice, and canned green beans. (I love canned green beans! Don't judge.) I thought the resulting plate looked nice, and it tasted great too.


Stay tuned for the meals I made using the rest of the roast!

Wednesday, December 19, 2012

Dinner Shortcut

Today was a long one. I was looking for a quick dinner with a short grocery list. This was it!

I already had some of the ingredients.

I had most of a rotisserie chicken leftover from when I used half of the breast meat for buffalo chicken dip for a party. (Yum!) The celery came from the same thing.

I have a stockpile of Ronzoni Smart Taste pasta I ordered by the case from Amazon a while back when I thought it would be discontinued. Weird, I know, but I really like the stuff.

My brother-in-law has been telling me about Philadelphia Cooking Creme. It's on the same grocery shelf as the regular cream cheese, but it's flavored and pourable, designed to serve as a sauce. I bought the Italian Cheese and Herb flavor to try tonight.

First, I put a pot of water on for the pasta.

Then I started out by dicing a medium sweet onion and a few sticks of celery. I cut a small broccoli crown into bite-sized florets. I picked the meat off of the chicken bones and cubed it. I even used some of the dark meat; I just diced it a little smaller than the white meat. It amounted to about 2 cups of chicken.

I added a couple of teaspoons of olive oil to a large saucepan and turned it to medium heat. I added the onion and celery to the pan and salted it.  I sautéed the veggies until they were tender, about 8 minutes.


Meanwhile I put 8 oz. of rotini into salted boiling water. When the pasta had five minutes left to cook, I added the broccoli to cook along with it.

When the pasta and broccoli were done, I drained them into my cool collapsible colander. (It is dishwasher safe and takes up very little space in the dishwasher or cabinet. Love it!)

I added the chicken to the onion and celery pan, then added the drained pasta and broccoli, and stirred in the container of cooking creme. I should have saved a little of the pasta water to loosen the mixture up a bit. Next time I'll  know better.

In the end, I ended up with a nice plate of pasta that took very little time to cook. Yeah!


Sunday, December 16, 2012

Dinner Tonight: Pork Chops and Apples

Finished Product!
Today my husband woke up feeling a little under the weather. He felt better after a day of rest, and I decided to make some of his favorite foods for dinner: pork chops and cooked apples.

(I can't help but think of The Brady Bunch and "pork chops and applesauce.")

About three hours before I cooked dinner, I decided to brine the bone-in pork chops. I combined about 1/4 cup each of salt and brown sugar with about a cup of boiling water. I stirred until the salt and sugar were dissolved.

I added 1/4 cup of apple cider vinegar, 6-8 whole black peppercorns, 1/2 teaspoon of whole mustard seeds, a teaspoon of whole coriander, and a bay leaf. Then I added ice cubes and stirred them in until the mixture was cooled.

I put the pork chops and brine mixture into a gallon zip-top bag and put it back in the refrigerator to soak up some flavor.

About 30 minutes before I was ready to cook, I took the chops out of the refrigerator to come closer to room temperature.

Meanwhile, I peeled and chopped two apples. (I think they were Galas).  They were crisp and sweet. (Please ignore that one is upside down in the picture.)


I also had some Granny Smith apples, but I would have had to add a lot more sugar to sweeten them, so I stuck with these. I chopped them into pieces about 1/2 - 1 inch each.


Next I chopped one sweet onion. I chopped half of it into larger pieces to add to the pan with the pork chops and apples.

The other half, I chopped a little smaller. I also chopped 3 small zucchini into bite-size pieces for a zucchini-onion saute.

For some reason, I do not seem to be able to cook zucchini for two. Note to self: we only need 2 small zucchini and 1/4 of an onion for our dinner if we don't want leftovers.

I put olive oil in the bottom of two nonstick pans, one large and one small. It doesn't take much, maybe a couple of teaspoons.

I turned the large skillet to medium-high heat. While it got hot, I took the pork chops out of the brine and patted them dry. I salted and peppered each side.

When the oil was hot, I added the chops to the pan to brown, about 3-4 minutes per side.

Once they were browned, I added the apples and the onion I had set aside for this dish. I added a tablespoon of brown sugar on top of the apples and onion, along with 2 tablespoons of apple cider vinegar and 1/4 cup of water.

I turned the heat down to medium and covered the pan.

Next, I turned the smaller pan onto medium heat.

When the oil was hot, I added the zucchini and the rest of the onion, plus salt and pepper to taste.


Incidentally, I used this cool little tool to make that job easier.  I love this thing! It's called a bench scrape. I think it was designed to use with pastry, but I use it all the time to get chopped ingredients into pans without spilling them all over the place. (It's the little things in life!)
I covered the pan so the veggies would soften the way we like them. If I hadn't covered them, I would have added a little water so they could cook without sticking or burning.

I let both the chops and the zucchini cook about 15 minutes, until both were done. (I used an instant-read thermometer to make sure they were at least 165 degrees.

I used the cook time to empty the dishwasher and fold laundry. Does anyone else hate emptying the dishwasher as much as I do? My next least favorite chore is folding laundry.

Oh well, by the time I was finished, we had a nice dinner ready!

(When I plated my dinner, I realized that next time I will slice the apples rather than chopping them, so they won't be the same size and shape as the zucchini.)

Dinner was tasty!  Now on to ironing....
Friday, December 7, 2012

Ham and Bean Soup

Last weekend my family had our Thanksgiving gathering. In addition to a turkey breast, we also had a bone-in Smithfield ham. My mom and sister assured me the ham bone would make the base for a great soup, so I threw it in the freezer.

Today was the day for soup!

I bought a 20-ounce bag of mixed dried beans and found a method for quick-soaking the beans on the internet since I didn't want to wait to soak them overnight. 

(OK, so this is an empty bag. I forgot to take a picture before I put the beans in the pot.)
Put the beans in a large pot and add water to 3 times the volume of the beans. Do not salt the water. Apparently salting at this point will cause the skins of the beans to become tough. Also, ham is often salty and the soup may not need additional salt.

Bring the beans to a boil, then cook at moderate heat for two minutes. 

Take the beans off the heat, cover, and let sit for one hour. Drain.

Meanwhile, dice up one onion.

I always use sweet onions because I don't like to cry while cooking. 

Peel and dice 5 small carrots and dice 4 celery ribs. 

In an 8-quart stockpot over medium heat, drizzle 2-3 teaspoons of olive oil. Add the vegetables to the pot and sweat them until they are softened. I added salt out of habit, but I recommend waiting to season this soup until the end as the ham can be pretty salty.

Slice or mince 4 cloves of garlic and add to the vegetables. 

Once the vegetables are tender-crisp, add the drained beans. Place the ham bone in the pot.

Add 32 ounces each of vegetable and chicken stock. 

When I made vegetable soup a few weeks ago, I added a Parmesan cheese rind I found in my freezer. The results were so great, today I cut the rind off the Parmesan in my refrigerator and added it to this pot.

I also added a few dashes of liquid smoke. I would say this is optional, but as far as I'm concerned everything is optional. I'm always editing recipes to add ingredients we like and omit items we don't like.

Cook for at least an hour. This is where the judgement call comes in. The recipe I found said to cook it 8 hours. Based on my two hours of cook time, I can't imagine any beans would be left intact by then. Next time I'll only go an hour. Especially since I like to freeze the extra for another day.

To add some texture and extra nutrition, I decided to add some Swiss chard. This is rainbow chard. Aren't those red stems pretty?

I thought about chopping the stems and adding them to the soup, but I haven't cooked them before and didn't want to ruin anything. I'll experiment another day. 

(I found a recipe that said to treat the stems like asparagus. I know how I like to cook asparagus, but didn't know how that would fit into this soup so I ignored it).

Strip the leaves from the stems and chop the leaves. I chopped them fairly fine for two reasons: 1) I've not used this green before and didn't know how it would do in the soup, and 2) my husband doesn't love greens, but he's fine if they aren't too prominent.

When the soup had cooked an hour, I tasted it for seasoning. It tasted great!

I added about half of the chopped chard. Once I stirred it in, I found that seemed like plenty. This is to taste, though. Personally, I would have been good with the whole bunch but decided to stop with half for my husband's sake.

Before you serve this, stir through the soup and pull out what's left of the Parmesan cheese rind and the ham bone. 

Some clumps of fat and unsightly clumps fell off of my ham bone and I removed those. I removed the bone and pulled quite a bit of beautiful tender meat and added it back to the soup pot.

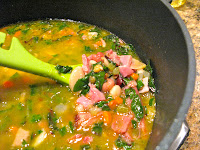
The soup turned out to be so delicious!

I cooked some cornbread to eat with it. 

I put the rest in quart zip-top bags and froze them for easy meals for other busy nights.

Yeah! I love homemade soup!


Thursday, November 22, 2012

Vegetable Beef Soup - For Thanksgiving?

Today is Thanksgiving Day. Our big, traditional family feast won't happen until next weekend, so three of us will go to a restaurant to eat later today. I guess I was feeling a little left out of the cooking that usually happens today.

So...I decided to make a big pot of soup and clean out the freezer at the same time.

I pulled everything out of the freezer and took a "soup" inventory.

First, I had one lonely hamburger patty and a couple of packages of filet beef tips that I cut into small pieces.

I put the meat down into the bottom of my 8-quart pot and turned it up to high.

It was already browning when I realized I had not added any fat to the pan. Oh well. It turned out fine anyway!


Then I found some packages, some open, some not, of various veggies: corn, chopped spinach, butter peas, and mixed vegetables.

(I tried to chop the spinach even finer. but my immersion blender did not appreciate that effort...)

Once the meat was browned, I dumped all of these in the pot.

I found some little packages of leftovers: a couple bags of chopped onions and several slices of cooked bacon that I chopped up. 

I also found a parmesan cheese rind. I had tossed it in the freezer some time ago, because I heard a TV chef say you could add it to soups. Here goes!

In my refrigerator were a few tablespoons each of sauteed vegetables I used earlier this week: mushrooms, zucchini, and more onions.  Why not throw those in too? 

Also in my refrigerator was half of a small onion. I chopped it up and added it.

Then I checked the pantry for more possibilities. I used the tomatoes after blending them up, and also the black beans, rinsed. I didn't end up using the white beans. 

For me, vegetable soup is all about adding things until it just looks right. It looked right to me without the beans!

I also used a whole 32-ounce box of low sodium chicken broth. I didn't have beef, or I would have used that instead.

I still wanted a little more liquid, so I found some chicken broth I had made and frozen last week and added it as well. A great thing about a simmering pot of soup is that you can just dump stuff in even while it's still frozen.

I added a few cloves of chopped fresh garlic, a little salt and some crushed red pepper flakes.

I wanted the soup to have more of a tomato flavor, so I went to the refrigerator to pull out my tube of tomato paste only to find out I didn't have any. I remembered running across a cup of leftover marinara sauce in the freezer, so I pulled it out and added it to the pot. Since I added marinara, I decided to also add some dried oregano, a few springs of fresh thyme, and two bay leaves.

Now it looked yummy!

After it simmered about 25 minutes, I tasted it for seasoning.  It tasted good, but it still needed something.

I used a trick I borrowed from a Cincinnati Chili recipe I made years ago. I added a teaspoon of unsweetened cocoa. It sounds weird, but just adds a little more flavor without any hint of chocolate.

After an hour of simmering, I cooled the soup. Of course, it's best to cool it completely before freezing, so I used this contraption a friend introduced me to a few years ago.

You fill it with water then freeze it, and put it in a pot of soup (or whatever) to cool it quickly.


I put the pot in the sink, surrounded it with ice water, and added the frozen "thingy." I don't know what it's really called, and even if I did, I bet not many other people would know what I was talking about anyway!

Now I have lots of delicious soup, and my freezer is newly organized!

We have supper for later tonight after our restaurant lunch, two small packages for my mother-in-law's freezer, and two larger ones for ours. 


A good morning's work, and something else for which to be thankful.