"Choose your companions before you choose your road."
Mark Burnett
I heard this quote last week and it immediately resonated with me.
Now, as a believer I'm pretty sure I'm supposed to choose my road first. You know, the straight and narrow. But well, I guess I did choose Jesus first, so maybe it works after all.
Anyway, I have some great traveling companions in this life: husband, family, friends, coworkers. They make all the difference.
First came the family. I had two hardworking, loving Christian parents who only wanted the best for us. I have a sister I love and with whom I played house, school, Barbies, Lite Brites, and Monopoly. She's added a great husband and two amazing kids to the family. My mom has even recently added to our number by marrying into the Knowles clan, which is full of fun, friendly people. Not to mention the nearly innumerable aunts, uncles and cousins we already had!
Of course, I didn't choose them; I'm just blessed to have them.
I did choose my husband. Or maybe he chose me. Whichever it was, it's worked out pretty well! He loves and supports me, works hard, and is lots of fun. He knows the worst and loves me anyway. I am a better person today than I would be without him.
I've had some great friends all along the way, from childhood to now. They have encouraged me to good behavior and embarrassed me out of bad. They have told me the truth, and laughed and cried with me. A big part of who I am today has been influenced by my friends.
I even get to work with great people, many of whom are also my friends. How often does that happen?
Back to the quote. It means that who you're with is even more important than where you're going. Again, I'm not completely sure it holds up if you take it literally, but I love the sentiment. The people with whom we choose to spend our time influence us greatly. They can encourage or discourage, support or undermine, energize or drain, build up or tear down, exhort or criticize, love or hate. It's important that we choose our companions wisely.
But, you know? It's also important that we are good companions. Could those around me say that I make them a better person just by knowing me? Do I bring out the best in them? Do I "rejoice with those who rejoice, weep with those who weep?" (Rom. 12:15) Do I consider others more important than myself? (Phil. 2:3) Do I act with kindness and forgiveness? (Eph. 4:32) If I'm honest, I have to say not often enough.
How about you?
Tuesday, August 13, 2013
Monday, August 5, 2013
DIY Terra Cotta Servers
I like crafts. Unfortunately, mine can often be mistaken for 3rd grade vacation Bible school projects. So, it was really brave (or delusional) of me to plan to use homemade projects as serving pieces at a shower we gave recently.
 I was watching "The Chew" and saw them making serving pieces of terra cotta pots. Here's the link to the segment:
http://abc.go.com/shows/the-chew/blogs/Craft-Corner/Clinton-Kelly-Entertain-With-Style-Summer-Decor
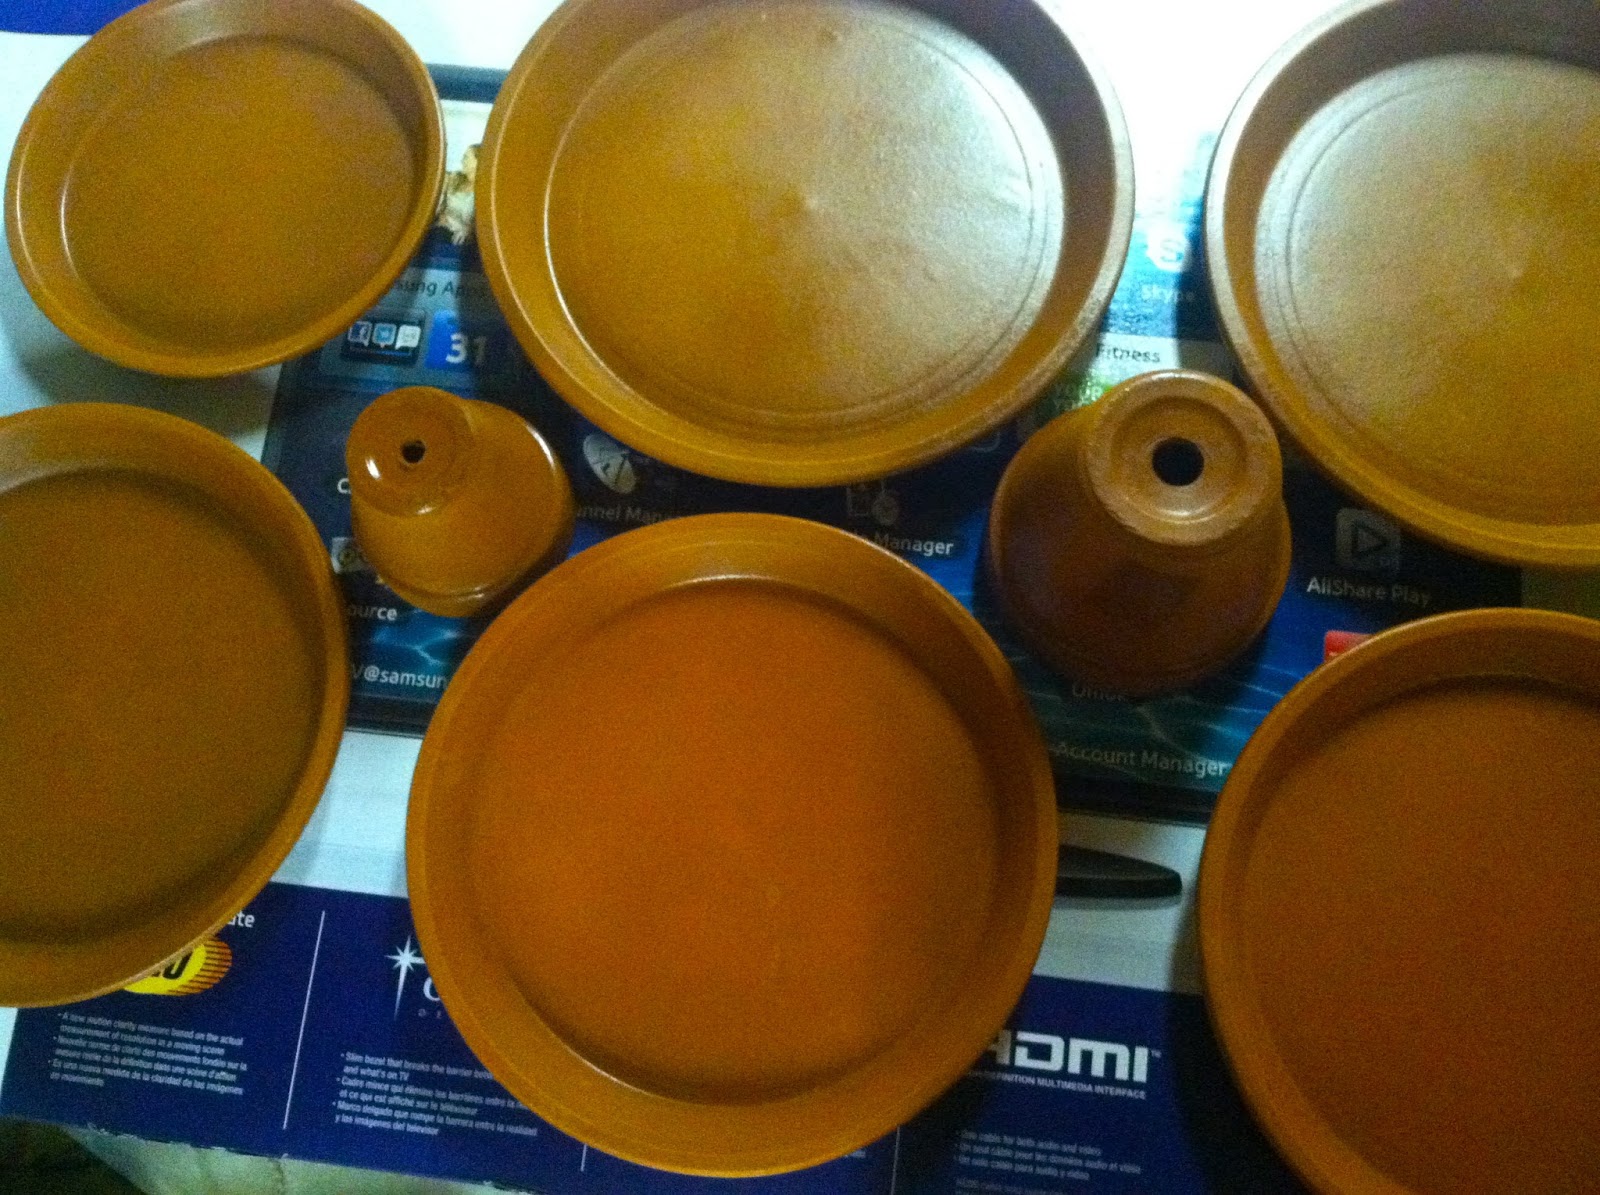
I made a few minor changes in mine. Theirs had the pots turned right-side-up, but I thought they would be more stable with the widest part of the pot down. Also, I tried to make the pots as small as possible compared to the saucers so I would maximize serving space, but still maintain stability.
I went to Home Depot and Pike Nursery and bought saucers and pots. No one seemed to mind as I used a space on the shelf to try out pieces for my servers. I mixed and matched pots and saucers until I had what I wanted. I got materials for one three-tier server with each tier smaller than the one below, one two-tier server with saucers of the same size, and one plain saucer to use as a tray.
I washed all of the saucers and pots with soapy water and let them dry for a day.
Next, I realized I wanted to seal the terra cotta so it wouldn't stain with moisture, and also to produce a consistent color.
 I got a spray can of terra cotta sealer at Michael's. An employee said the sealer was food safe, but the can didn't mention it at all. I decided I would line the servers with cloth napkins, parchment, or saran wrap just in case.
When it came time to seal the pieces, I started to spread paper on the garage floor. Then I thought, "Why should I be uncomfortable in my crafting?" I set one cardboard box on top of another in my basement utility room. The room is not quite climate controlled, but it's close enough and there was no breeze to blow the spray around!

I used two coats of the sealer.
Once the sealer was no longer tacky (within one hour), I assembled the servers.
I plugged in my new mini glue gun so it could begin heating up.
A glue gun is pretty important in the crafting world!
This one worked fine but leaked a little. Yeah for paper towels!
 My impatience sometimes works against me, as it did in this instance. I didn't take the time to mark the center of the saucers so I could center the pots inside them. I decided to just eyeball it.
(Hmmm, could this have something to do with the often childlike quality of my crafts?)

I started with the two-tier server. I set out the bottom saucer, then added hot glue to the rim of the pot that would sit on top.
Working quickly, I set the pot in the center of the saucer and pressed. The glue dries really fast, so hurry!
Then I added glue to the other end of the pot.
 I quickly placed the other saucer on top to form the top tier and pressed firmly.

This one turned out fairly even and centered.
Next, I used the same method for the three-tier server. I had three different sizes of saucers and two sizes of pots. This one did NOT turn out quite so centered, so we had to place it strategically on the table so as not to call attention to its wonkiness.
Mark the center of your saucers (on the top and bottom as appropriate) if you do this! I think the drainage holes in the pots would make it fairly simple to line up by eye.


A few things I learned and am passing along to you:
1) As already stated, mark the center point on your saucers. To be really accurate, you could run a small dowel (or chopstick) through the drainage hole of the pot to help line up the hole with the center mark.
2) After the shower, I was loading the larger server into the car and the top two tiers fell off of the base. Nothing was harmed, but I realized that for longevity, I should have used an adhesive made especially for ceramics.
 3) If possible, pass up pots that have stickers on them. One of my pots had a sticker-shaped mark left on it even after it was washed and sealed. I used it anyway. (Once again, childlike quality.....)
Anyway, overall I was very happy with how they turned out and how easy they were to do. I highly recommend this project.

Here's a picture of the table at the shower.
Go forth and craft!

http://abc.go.com/shows/the-chew/blogs/Craft-Corner/Clinton-Kelly-Entertain-With-Style-Summer-Decor
I made a few minor changes in mine. Theirs had the pots turned right-side-up, but I thought they would be more stable with the widest part of the pot down. Also, I tried to make the pots as small as possible compared to the saucers so I would maximize serving space, but still maintain stability.
I went to Home Depot and Pike Nursery and bought saucers and pots. No one seemed to mind as I used a space on the shelf to try out pieces for my servers. I mixed and matched pots and saucers until I had what I wanted. I got materials for one three-tier server with each tier smaller than the one below, one two-tier server with saucers of the same size, and one plain saucer to use as a tray.
I washed all of the saucers and pots with soapy water and let them dry for a day.
Next, I realized I wanted to seal the terra cotta so it wouldn't stain with moisture, and also to produce a consistent color.
 I got a spray can of terra cotta sealer at Michael's. An employee said the sealer was food safe, but the can didn't mention it at all. I decided I would line the servers with cloth napkins, parchment, or saran wrap just in case.
When it came time to seal the pieces, I started to spread paper on the garage floor. Then I thought, "Why should I be uncomfortable in my crafting?" I set one cardboard box on top of another in my basement utility room. The room is not quite climate controlled, but it's close enough and there was no breeze to blow the spray around!
I used two coats of the sealer.
Once the sealer was no longer tacky (within one hour), I assembled the servers.
I plugged in my new mini glue gun so it could begin heating up.
A glue gun is pretty important in the crafting world!
This one worked fine but leaked a little. Yeah for paper towels!

(Hmmm, could this have something to do with the often childlike quality of my crafts?)

I started with the two-tier server. I set out the bottom saucer, then added hot glue to the rim of the pot that would sit on top.
Working quickly, I set the pot in the center of the saucer and pressed. The glue dries really fast, so hurry!
Then I added glue to the other end of the pot.


This one turned out fairly even and centered.
Next, I used the same method for the three-tier server. I had three different sizes of saucers and two sizes of pots. This one did NOT turn out quite so centered, so we had to place it strategically on the table so as not to call attention to its wonkiness.
Mark the center of your saucers (on the top and bottom as appropriate) if you do this! I think the drainage holes in the pots would make it fairly simple to line up by eye.
Anyway, here's the three-tier one on its good side!

Obviously nothing more than glaze was needed for the serving tray.

A few things I learned and am passing along to you:
1) As already stated, mark the center point on your saucers. To be really accurate, you could run a small dowel (or chopstick) through the drainage hole of the pot to help line up the hole with the center mark.
2) After the shower, I was loading the larger server into the car and the top two tiers fell off of the base. Nothing was harmed, but I realized that for longevity, I should have used an adhesive made especially for ceramics.
 3) If possible, pass up pots that have stickers on them. One of my pots had a sticker-shaped mark left on it even after it was washed and sealed. I used it anyway. (Once again, childlike quality.....)
Anyway, overall I was very happy with how they turned out and how easy they were to do. I highly recommend this project.

Here's a picture of the table at the shower.
Go forth and craft!
Friday, June 21, 2013
A Lesson From Dad
At our small group summer Bible study, we begin with dinner.
Well, of course we do. We’re Southern women and several of us are Baptist, so
really we have no choice in the matter!
Anyway, the conversation over dinner the other night got
around to our first cars. Most of us had
similar stories. Anyone who knows me well has probably heard about my first two
cars. The first one was a Volkswagon Dasher, school-bus yellow, with an enormous
steering wheel because it had no power steering. I think I only had it for
about a year before it made the trip to the junkyard.
My second car was a 1978 Honda. I don’t even know if it had
a model name; it was about the size of a Smart Car. It had a manual
transmission (with a choke, no less) and had after-market radio and
air-conditioning. Sometimes the engine stopped while I was driving and I had to
pop the clutch to get it started again. At one point, I had to carry gallons of
water with me because the radiator leaked and it wasn’t worth repairing. I drove it
for a few years before it too made its way to the junkyard.
My friend's dad was a mechanic. He wouldn’t let her
ride with me in one of them (I think it was the Dasher) because he didn’t think
it was safe. When I reported this to my dad in the hopes that I could guilt him into getting me a better car, he just shrugged and smiled. I even accused
him of not caring about my safety: again, the shrug and the smile. So
frustrating!
Now, I’ve known my entire adult life that I had those cars
because that’s what my parents could afford for me to have. I probably really
even knew it then. I’ve enjoyed sharing stories with friends, each trying to
one-up the other with “my car was so bad….” stories. I’ve felt sorry for those whose parents gave
them new cars because they had no stories to tell; they had no cars with
“character” in their pasts.
Only this week as I reflected on that dinner conversation,
did I get a new revelation.
It started with me remembering how one lady said she didn’t
have a car at all. Another had to share a car with her siblings. My sister and I
each had our own cars so obviously we were better off than lots of people even
If I didn’t appreciate it then.
Then I remembered how most of my life I’ve heard that we tend to relate to God according to our relationship with our earthly fathers. If
you had a loving, caring father, it's easier for you to see God as a loving,
caring God.
Somehow (can you say, Holy Spirit?) I put the thoughts about
my first cars together with the truths about earthly fathers and God. For the
first time, I realized that maybe the reason that I have been able to trust God
even when bad things happen, is that I trusted that my dad loved me and wanted
the best for me. Even when I didn’t understand it.
I accused my dad of not caring for my safety by giving me
bad cars to drive. I didn’t really believe that and he knew it. But he never
felt the need to defend his decisions. He never said that’s all we could afford
and I should be grateful to have a car at all. He never took away the keys and
said, “you can drive this car or have none at all.” He just shrugged and smiled, and deep down I
knew, because of a million other things, that he did love me and care for my
safety. I just didn’t understand it all then.
I really think that because he didn’t think I always
deserved an explanation for his decisions and plans, I can now accept most
things without losing trust in God. I may not understand things, or like them,
or think they were the best option (after all, I usually have a plan and surely
mine is the best!), but deep down, I know God loves me and wants what’s best
for me. Even when I don’t understand it.
I didn’t understand when my dad was diagnosed with leukemia
at 56 and died at 58. Why him and not some nasty person who would never follow
God? Why don’t my niece and nephew get to know him? My dad was faithful and
good and steady. I have a vivid memory of walking with him through the hospital
during one of his lengthy stays. He was bald due to chemo, wearing a hospital
gown, and wheeling an IV pole. He stopped to talk to a woman who was crying
outside one of the rooms, asked her if he could help, and prayed with her. How
could God take this man and not someone else?
I didn’t understand why it had to happen, but I never really
lost trust in God. I knew deep down that His ways are higher, that He loved me
and wanted what’s best for me.
It's pretty cool that I can still learn from him, even though he's been gone for over ten years. Thank you, Dad.
Wednesday, June 19, 2013
Mundane Chores = God’s Blessings
I’m doing Priscilla Shirer’s Bible study, Gideon, with some friends this summer.
It’s only been two weeks of homework and already I’m getting so much out of it!
As part of the study, she asks us to summarize what we learn
each day in a “tweet” with the hash tag LessonsFromGideon. It’s something you
can do even if you don’t have a Twitter account: just record your lesson in the
workbook. I can’t come up with one every
day, but the process of trying to create a brief summary of the day’s study
helps me solidify it in my mind.
Last week, we studied about how Gideon, the most
insignificant member of his family, was doing the most mundane of tasks in the
most mundane of places when God came to him. God called him a “valiant warrior”
and told him to deliver Israel from their oppressors, the Midianites (Judges 6).
One lesson from that day was that my boring, thankless
daily tasks today (think making the bed, doing laundry, cooking dinner, washing
dishes, routine jobs at work) may be preparing me for a greater calling in the
future.
He who is faithful in a very little thing is faithful also in much,” Luke 16:10.
Am I so faithful in
the routine items of the day that God will trust me with something great for
Him and His Kingdom?
The bigger “A-ha!” for me, though, was the idea that those
mundane, boring things that I often dread or just take for granted, actually
represent great blessings from God.
That bed I make means I have a safe, warm (or cool) place to
sleep every night.
The laundry I do means I have clothes to wear, and lots of
them.
The dinner I cook for my husband means I have a husband who loves me, provides
for us, and comes home to me at night.
The dishes I wash (actually, load into the dishwasher) mean
I have a nice home to live in, with modern appliances.
The routine jobs at work mean I have a job and that I find
meaning in it.
What else do I take for granted each day that actually stems
from a blessing from God? After all,
“Every good thing given and every perfect gift is from above, coming down from the Father of Lights….” James 1:17
How much better and more fulfilling would my life be if I
had a grateful heart every day? How
about you? Do you need to develop an
“attitude of gratitude?”
By the way, I just “tweeted” the title of this entry. It’s
my first tweet! If you want to see what
other people are learning while studying Gideon, search #LessonsFromGideon on
Twitter. There’s some good stuff on there!
Monday, April 15, 2013
Leftover Stir Fry
 We (and by "we" I mean "I") waste so many leftovers. I just don't usually want to eat the same thing two nights in a row. And I enjoy leaving the office for lunch, so I don't bring my leftovers for lunch. I'm working to only cook the amounts we need for one meal, but sometimes that doesn't happen.
  Tonight's dinner inspiration came from restaurant leftovers. My husband and I had sauteed mushrooms, grilled shrimp, and steamed vegetables left after combining what was left when we ate at Longhorn last night. Since I also had a few small pieces of pork tenderloin in the refrigerator from a couple of nights ago, I decided to make a stir fry for supper tonight.
When I got home from work, I put 2 servings of brown rice on to cook. The package called for 1/2 cup of rice and 1 1/3 cups water. I added salt but omitted the butter. I used a nonstick pot, which I always use when cooking starchy stuff. I'm not a fan of scrubbing pots!
 Then I chopped half a sweet onion and diced the leftover pork tenderloin into 1/2-inch cubes. I also diced the Longhorn vegetables: broccoli, carrot and squash. To my Southern palate, they needed more cooking anyway! Then I removed the tails from the shrimp (so much better than trying to eat them!) and cut each shrimp into about 4 pieces.
 When I looked at my ingredients, I thought I could use more veggies. On my last grocery run I had bought a microwave pack of fresh French green beans. I didn't need them all, but I took a good handful, chopped off and discarded the ends, and cut the beans into small pieces.
I put a large saute pan over medium heat, added a drizzle of olive oil, and added the onion and carrot. I added a little salt and let them saute a couple of minutes until they softened some.

 A couple of days ago I put two small frozen chicken breasts in the refrigerator to thaw. I needed to cook the chicken, so I cut it into to small bite-sized pieces on a separate, dishwasher-safe cutting board.
I added the chicken to the center of the pan, then added the green bean pieces as well.
 Once the chicken was cooked through, I added about a teaspoon of ginger to the pan. I like this ginger-in-a-tube I found in the produce department. I've bought, peeled, and frozen countless pieces of fresh ginger only to have them wither away before I use them. This stuff works great for me.
 I also added a clove of garlic, minced.
Once that was combined well, I added the remaining veggies, the pork, and the shrimp. See how pretty?
Here's a close-up:

 Meanwhile, the rice had cooked long enough so all the moisture was gone. I let it cook a minute or two more and a cool thing happened: it started to stick a little to the bottom of the pan and some of the pieces were crispy. The texture was similar to fried rice without any added fat. Yeah!
I added the rice to the pan and stirred it in, along with a tablespoon or two of soy sauce, and about 1/2 teaspoon of sesame oil. I tasted it as I went and added from there.
The finished result was pretty darned tasty! The great thing about this dinner is that it can be made with lots of different proteins and vegetables. I plan to make this again when I have random leftovers in amounts too small to make meals of their own.

Wednesday, March 27, 2013
Roast Chicken Dinner

A roasted chicken dinner is classic comfort food. This one took two hours to cook, but pretty much cooked without too much interference.
The recipe is from one of my Giada DeLaurentis cookbooks. Click here to get the recipe found on the Food Network website: Garlic and Citrus Chicken
One key is to gather everything you need before touching the raw chicken. I got out my big roasting pan and rack. Do what I forgot to do: spray the rack with nonstick spray!
 I cut up the lemon, orange, and garlic head, then put some salt and pepper in small bowls so I could use it while working with the raw chicken.
  I unwrapped the chicken, removed the packet inside, and rinsed and dried the chicken. After seasoning the chicken inside and out with salt and pepper, I stuffed as much of the citrus and garlic as would fit into the cavity.
Then I was supposed to tie up the legs, but my kitchen string had somehow disappeared. I was able to make slits in some of the extra skin to secure the legs. Not very elegant, but it seemed to work OK.


The chicken cooks for an hour before it is basted in a citrus sauce. It already looked pretty nice and it still had another hour or so to cook.
 When the chicken was almost finished cooking, I made a simple salad of mixed baby greens and tomatoes. I love a vinaigrette, and this is the easiest one ever. Put the greens in a bowl and sprinkle them with red wine vinegar, olive oil, salt and pepper. Toss together and adjust the proportions to taste. Add the tomatoes on top.
 Another great quick side are these French green beans in a microwavable pouch. I'm not normally a fan of cooking in the microwave, but these are so quick and taste good. You just cut the corner off of the package and microwave them for 3 minutes. Then, for a little extra flavor, I put them in a small skillet and sprinkled them with red wine vinegar, olive oil and salt and pepper.
 All in all, it made a nice looking plate.
You'll notice I did not take pictures of my great butchering skills. That's because I have none!
Try it this weekend. If you have a small family, you might even have more than one meal with this roast chicken.
Sunday, March 17, 2013
Baking Bread!

Over the years, my dear friends have given me their sourdough starter again and again. The reason? I forget to feed mine and it dies. (Come to think of it, maybe it's a good thing I never had kids....)
So - when I found a recipe for a sourdough starter in the Cobb-Marietta Junior League "Southern On Occasion" cookbook, I was so excited!
I made the starter, which is a simple mix of water, instant potato flakes, sugar, and yeast. The mixture was left on the counter for 4 days to "sour;" then it was ready to use. I took 1 cup to use in the bread and put the rest in the refrigerator. (I sure hope I remember to feed it this time.)
In my mixer bowl, I added 6 cups of bread flour, 1 tsp. salt, 1 cup of starter, 1/2 cup sugar, 1/2 cup canola oil, and 1 1/2 cups hot water.
 With the dough hook attached, I ran the mixer until the dough came together into a ball and cleaned the sides of the bowl.
I lightly oiled a huge bowl and dumped in the dough, turning it around to coat the whole ball. (When we received the giant bowl as a wedding gift, I thought it was pretty, but I had no idea how I would ever use it. Now I love it for my bread bowl.)

Then I covered the bowl with a damp cloth and put it in a sunny spot on the kitchen table. (Since it was only a sunny spot for an hour at most, it was probably pointless, but it seemed like the thing to do.)
I let it sit until the dough doubled in size. It took about 12 hours.


This recipe makes 3 medium-sized loaves, so I sprayed 3 bread pans with nonstick spray. Then I dusted the counter with flour.
 Then came the best part: punching down the dough. It's not nearly as violent as it sounds. All you do is put your fist down in the middle of the dough to deflate it, but it's surprisingly fun!
Then I dumped the dough onto the floured counter. It's pretty sticky, so I sprinkled a little more flour on top. I kneaded the dough for a couple of minutes, incorporating most of the flour on the counter in the process.
Don't know how to knead? Just pick up one side, pull it over the rest, and press down on the dough ball with the heel of your hand.


Repeat over and over for a couple of minutes.
(Incidentally, it's a lot easier to do this with two hands. I don't recommend trying to knead dough and take pictures at the same time.)

When I was finished kneading, I took my handy-dandy bench scrape and cut the dough into 3 equal(ish) pieces. I love this tool. I usually use it to gather up chopped veggies to add into a pot, so it was pretty cool to use it for it's actual purpose this time!

 I took each piece and formed it into a rough log. You can see what I mean by "rough." I don't worry about trying to make it too smooth since it's homemade bread. Who wants people to wonder if you really made it yourself?
I brushed each loaf very lightly with canola oil, and covered each one loosely with plastic wrap. I left them out 12 hours to rise.


I love it when time goes by and the result is beautifully risen bread! It's somehow very satisfying.
I baked the loaves in a 350-degree oven for 25 minutes, then cooled them on a rack. I like a tender crust, so I wrapped them in plastic wrap when they were still a tiny bit warm. Otherwise, I would wait until they were completely cooled.

Lessons I've learned:
1). Use only fresh ingredients. My canola oil was a little stale and you could taste that in the end product.
2). Check the instructions to your mixer to be sure it's OK to mix a heavy dough. I burned out the motor of my first KitchenAid mixer by mixing heavy dough on the wrong speed. An expensive mistake I don't intend to make again!
3). Rotate your loaves halfway through baking if your oven has a "hot spot." I have no excuse. I knew the back left corner of my oven is hottest but didn't bother rotating. Hence the dark brown spot!
The bread is great toasted with jelly and it makes the absolute best grilled cheese sandwich anywhere. The dough also makes great cinnamon rolls. I plan to try substituting some of the flour for whole wheat flour and see how it works.
Try making your own bread if you never have. It makes me feel so accomplished! You don't have to tell anyone how simple it is.
Subscribe to:
Posts (Atom)